Tuesday, April 28, 2020

Use your Canon Camera as Webcam with Amazing Video Quality

Canon Webcam

Interested in improving the video quality of your own Zoom frame tenfold? If you’ve got a recent Canon mirrorless, DSLR, or PowerShot camera, you can now use it as a webcam and put everyone else on your video call to shame. As noted by DPReview, the company has released a beta of “EOS Webcam Utility” for Windows 10 that lets you plug in any of the below supported cameras over USB and have it serve as your PC’s webcam. And this should work fine for most of the big video conferencing options, whether you’re using Zoom, Microsoft Teams, BlueJeans, or another service.

Supported Cameras that Can Use EOS Webcam Utility

Here are the supported Canon Cameras that can be used as a webcam:

EOS DSLR Cameras                 EOS Mirrorless Cameras                PowerShot Cameras

EOS-1D X Mark II                         EOS M6 Mark II                                     PowerShot G5X Mark II
EOS-1D X Mark III                        EOS M50                                                 PowerShot G7X Mark III
EOS 5D Mark IV                            EOS M200                                               PowerShot SX70 HS
EOS 5DS                                          EOS R
EOS 5DS R                                      EOS RP
EOS 6D Mark II
EOS 7D Mark II
EOS 77D
EOS 80D
EOS 90D

EOS Rebel SL2
EOS Rebel SL3
EOS Rebel T6
EOS Rebel T6i 
EOS Rebel T7
EOS Rebel T7i
EOS Rebel T100

Canon as a Webcam

With so many of us relying on video calls to stay connected during these challenging times, the quality of that connection is key. Turn your compatible Canon camera into a high quality webcam now!

“Built by Canon software developers, this beta version software helps consumers to improve their video appearance while using popular video conferencing applications in the market, delivering clarity and high-image quality,” Canon wrote in its press release.

Canon’s solution cuts out the need for any extra devices or accessories beyond a single USB cable, so if you’ve got one of the listed cameras, this is definitely worth a try. Sorry, Mac users; there’s no EOS Webcam Utility for Apple’s software quite yet, but you should be able to find some third-party apps to achieve the same end result.

How to Use EOS Webcam Utility from Canon

Here is a video about how you can turn your Canon Camera into a High-Definition webcam:

Share:

Sunday, April 26, 2020

How To Permanently Delete Snapchat Account

How To Permanently Delete Snapchat Account

If you are landing this post, then you are a Snapchat User. I know Snapchat is one of top trending application that might be made you addicted. But somehow, There are various circumstances due to which we have to delete our Accounts from these social media. There are very fewer tutorials on How To Delete Your Snapchat Account Easily? So Here we have discussed all easy ways to delete that!

After sometimes many people understand they are wasting time on Snapchat OR you maybe you feel bored of the similar-looking social media’s and wanted to delete the snapchat account permanently. This article is all about for people in that situation. If you want a small break you can deactivate the snapchat account for some time and at any time you can come back to your snap life. But this article is all about the ways you can completely get rid of snapchat.

How To Delete Snapchat Account Permanently

There is no option to completely delete your Snapchat account in your native snapchat application. So you have to do the following steps to delete Snapchat account permanently.

1.Open your favorite browser and visit the following URL
   https://accounts.snapchat.com/accounts/delete_account

2. On the following page Enter your valid username and password.
 
3. Enter the captcha and prove that you are not a robot.

4. Click the login button.

5. Again you have to enter your login credentials and click the login button.

6. Now navigate to the bottom of the page and press the delete my account button.

7. Now, all you need to do is wait for 30 freaking days. Snapchat have all your data backed up for 30 days as the last call. In case you change your mind and return to snapchat life you can do by just log in again to reactivate your snap chat account.

Other ways to Close Snapchat Account

This is just another way to reach the delete page. All you need to do is just head over to snapchat.com

1. Click the Support button at the bottom of the page under company section.

2. Now select Learn the basics option.

3. Select the My Account and Security options.
How To Permanently Delete Snapchat Account

4. Then select Delete my account.

How To Permanently Delete Snapchat Account
Now like the previous method you need to enter your username and password of you snapchat account and wait for the 30 days.

Conclusion

I hope this article will help you to delete your Snapchat account permanently. Let us know what’s made to delete a Snapchat account. Also, do share this post with your friends and family and help them to get rid of their Snapchat account. Your shares matter a lot for us. If you a tech-savvy you need to subscribe to our mail listing from which you can catch all the latest happenings in the tech world on your doorstep.
Share:

Saturday, April 25, 2020

Track Information on Any Apple Product Ever Made

Track-Apple

Apple, the company behind iPhone and Macbook Air, was founded in 1976. They have been around for around 44 years and during these years they have produced many devices. Some of these devices are no longer being produced and others have been replaced by newer models. For example, not many people know that Apple used to produce printers for home and office use. They no longer manufacture printers but now they are busy with other things.

If you are a big fan of Apple Inc., then you may want to try your hand at the free Mactracker program. The only purpose of this website is – to display detailed information about all the Apple hardware products that were ever produced. From Apple I that was released in 1976 to the latest Apple Macbook Air, you will find information about all the hardware in this small program.

Get All Information about Apple Products on Mactracker

The free Mactracker program gives all the details through its very well designed user interface . On the left side, you have to pick one of the categories of the Apple devices such as desktops, notebooks, servers, devices, software, and smart devices. Under each of these categories, you can choose any of the subcategories and then select one of the models.

Track Information on Any Apple

For each of the models, it displays some basic information about the software, memory, processor, graphics, network and more for that device. It also lists the price for that model when that device was first released. As soon as new Apple products are made available, it included them too in its database. Using the update feature, you can update its database to the latest version if desired.

Mactracker is a very useful Mac application that runs in both macOS and iOS. It can be your handy database of all the Apple products when you are buying or selling them online.

You can download Mactracker from https://mactracker.ca/.

You can Also check:

Share:

Thursday, April 23, 2020

How To Enable Skype Translator

How To Enable Skype Translator

Skype Translator is one of the best features in Skype that will help you to translate the speech. Skype Translator is a speech to speech translation application developed by Skype. So in this article, we have discussed all about How to use Skype Translator and How to enable it easily.

Skype is compatible with various operating systems such as Windows, macOS, Linux, Android, iOS, Windows Phone, HoloLens, and Xbox One. One major difficulty faced by people while talking to people via Skype is their language. People from different countries might not understand each other’s language. That's why Skype Translator can be very useful for you.

Skype Translator Features:

1. Languages Supported

Skype supports a number of languages such as English, French, German, Chinese (Mandarin), Italian, Hindi, Spanish, Portuguese, Arabic, Japanese and Russian.

2. On-Screen Text Transcripts

An addition to the Skype Translator, users are also provided with on-screen text transcripts that display the spoken phrases in their primary language along with the translation.

3. Real-time Translation

Skype Translator makes use of Microsoft Translator’s statistical machine translation technology. Using this feature, the speech is translated from one language to the other in no time and appears to be in real-time.

Skype Voice and Text Translator

Voice translator can currently translate conversations in 10 languages, including English, Spanish, French, German, Chinese (Mandarin), Italian, Portuguese (Brazilian), Arabic, and Russian.

Text translator is available in more than 60 languages for clear, seamless instant messaging. Of course, new languages are being added all the time, so if you don't see the language or dialect you need in this list of supported languages, keep checking back.

How To Enable Skype Translator

On Windows, Mac and Linux:

Launch Skype on your device and right-click on your contact. Now, click on view profile and click the name of the person you are talking to, at the top. Click on Start translator to create a new translated chat.

On Windows 10:

All the Windows 10 users can make use of this method. Right-click on your contact and go to your chat with them and click their name at the top. Click Start translator. A new translated chat will be created.

On Smartphones (Android and iOS):

Launch Skype app and in the chats screen, tap and hold on your contact. Now, go to your chat with them and tap on their name at the top and tap on Start translator.

Conclusion:

Skype Translator can prove to be a useful feature for those people who need to interact with people from various countries and speaking different languages. Setting the Skype Translator is quite simple! Also, it supports most of the widely used languages around the world. The list of all the supported languages is listed above. You can try it out for yourself and you will not be disappointed !
Share:

Monday, April 20, 2020

How to Recover Deleted Files on Mac

Recover-Deleted-Files-on-Mac

It is annoying to lose photos on Mac OS, especially when it is a permanently deleted (empty trash). Fortunately, you still have the option to recover deleted files and photos on Mac. This article presents a method that allows you to properly restore your files and photos on your Macintosh.

Recover deleted photos on Mac

Most people will think that deleted photos are lost forever. In fact, this is not the case. In fact, the mac OS just marks it as an unnecessary file when you delete an image, and you still have the option of restoring it.
Here's good news, the professional Mac photo restore tool can help you quickly and easily find recently deleted photos on Macintosh. It can completely recover photos permanently deleted from Mac or external storage devices. To save time, you can try iBeesoft Data Recovery for Mac to help you recover deleted photos on Mac.
This program is a recently released tool for Mac users to help them recover deleted files from external hard drives, SD cards, USB drives, etc. It only takes you 3 simple steps to recover the files.

Step 1. Install the application on Mac

Download iBeesoft Data Recovery for Mac. Double-click the .dmg installation package and drag it to the APP folder on your Mac.

Step 2. Select the file types to start

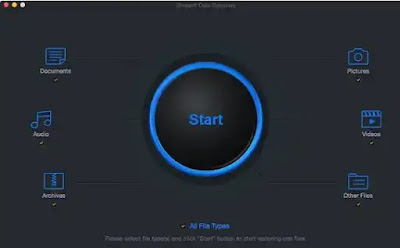
Launch the program, check Images and click "Start" to recover the deleted photos from your Mac.

Recover-Deleted-Files-on-Mac

Step 3. Select a location to scan the deleted photos

In this window, all hard drives or external storage devices will be displayed there. You need to select the hard drive where the original photos exist and click on the "Scan" button, letting the Mac software scan the deleted photos for you.

Recover-Deleted-Files-on-Mac

Step 4. Preview and recover deleted photos on Mac

It takes some time for the tool to complete the scanning process. Click on "Type" then "Graphics". Click on a category on the left side of the window to expand it. After that you can see the photos found on the right side. Find the target (s) and click "Recover" to recover Mac photos.

Recover-Deleted-Files-on-Mac

How to Restore Deleted Photos on Mac from Trash

If you deleted files or photos from your desktop or Mac folders, or dragged files directly to trash, you can always recover them from the trash. Just enter trash to view all deleted files. If you remember the names of the photos, you can try the search box at the top right of Mac, enter the name and search for them. Once found, just do right-click, and choose 'put back'.

Please keep in mind that this method only works when the photos were deleted recently. MacOS automatically deletes deleted items from the trash. If you deleted these files long time ago, try the first method to recover your photos.

Recover-Deleted-Files-on-Mac

How to Recover Recently deleted photos on Mac from iPhoto

If you've deleted photos on Mac via iPhoto, it's very likely that the deleted photos are in the "Recently Deleted" album. It gives you a period of 30 days, in case you regret the deletion. Here are the steps to recover deleted photos from iPhoto on Mac.

iPhoto is an old Photos app that was replaced with Photos by Apple in 2015. If you are still using the iPhoto app, then you will be glad to know that this app also has a dedicated album for deleted photos. In this app, that folder/album is called iPhoto Trash. If you have accidentally deleted your photos from the iPhoto app, then you can recover them from iPhoto Trash.

Step 1. Open iPhoto app on your Mac.
Step 2. Find and click on Trash displayed on the Sidebar of the app.
Step 3. Now press the Control button and click on the photos that you want to recover and then use the Put Back option to recover them.

Recover-Deleted-Files-on-Mac-iphoto

That's it,  you now know how to recover deleted files on Mac Os.

You can check:

Share:

How To Create a Virus in Less Than 60 Seconds

How-to-Create-virus

Learn how to create a computer virus in less than 60 seconds: Almost all computer and laptop users have experienced a virus attack at least once in their lives. Today we are going to describe five ways to create a virus in less than a minute. Find out how.

A virus is a malicious program that enters the computer without your permission and can affect your data and your operating system. There are different types of viruses, Trojans, Malware and others... But, have you ever thought of creating a virus? Then let me let you know that you can create one in seconds, and it is possible with a few simple methods that I will discuss in this post.
Many of you will think that methods should be coded, but there is nothing like that. The tips are based on notepad. Just follow the steps below to create a virus in a minute.

Create a Dangerous Virus:

  • Step 1. First, in your Windows operating system, open the notepad.
  • Step 2. Copy and paste the code below into your notepad.
  • Step 3. Now save this file as virus.bat (you can select any random name but .bat must be there and not .bat.txt).
Now executing the file will completely delete drive C, and the operating system of the affected computer will be corrupted.

Note: This method is for knowledge purposes only. Do not try this on your computer as it will completely format your C drive.

Create a Harmless CDRom Drive Virus:

Open Notepad and paste the following code into it, and save it as CD-ROM.vbs or anything * .vbs


When you double-click on this file, you will be surprised to see what this simple and harmless virus can do. Your CD / DVD drives will be ejected continuously.

To stop this virus, you need to open Task Manager (Ctrl+Alt+Del), and select the process tab and finish the wscript.exe file.

Create a Virus to Test Your Antivirus:

Open the notepad and paste the given code and just save the file as "Openhow"


If you have active antivirus, your antivirus program simply deletes this file in no time. This harmless virus is used to check the security level of your antivirus.

Virus to Stop Internet Access:

This is a harmless virus and it will not destroy your PC. You can use this trick to prank your friends. This virus stops anyone from accessing the Internet. You have to type
the following code in notepad.


Now save the file in .bat format as internet.bat and send it to your friends. The IP address will be lost, and therefore they will not be able to fix it.

Well, if you want to fix it. Just type IPconfig / renew


Creating a Matrix Screen

Well, this is not a real Virus. It’s just a simple notepad trick that will allow you to see a matrix of green characters appearing randomly. It has nothing to do with your computer registry, batch, etc. You can use this trick to scare your friend because the screen looks like it has been infected with a virus.
Just open Notepad and type the following code in it.


Now save the file as Matrix.bat, and click on it and let the show begins.

System Shut Down Virus

You can also create a virus that can shut down computers. Well, this virus is harmless, but can cause data loss due to sudden shutdown. Here's how you can make a stop virus to make a joke out of your friends.

Step 1. First, right-click on your desktop, then choose "Create Shortcut"

Step 2. Now in the pop-up window, type shutdown.exe -s -t 60 -c “Virus Detected. The computer is shutting down". Instead of 60, you can put whatever value you want. This represents time in seconds.

Step 3. Then click on the Next button and type chrome. Or whatever you want.

Step 4. Then you need to change the shortcut icon, choose the Google Chrome icon.

Your virus will look like Google Chrome. You can carry this file in your Pen-drive and shut down your friends' computers.

Also Check: How To Shutdown you Computer after a Certain Time

Conclusion

This was all about how to create a virus in less than 60 seconds. By this method, you can easily create the harmful and harmless virus and can make your friends silly. If you have other tips like this, you can share with us. I hope you like the post! Don't forget to share this cool post with your friends.
Share:

Sunday, April 19, 2020

Best Platforms for Creating Mobile Apps

Best Platforms for Creating Mobile Apps

Working with native code is a common practice. But it is not always the best choice in the business sense. Creating the same application for multiple platforms can result in a significant loss of time. HTML5 mobile interface frameworks can help you to build multi-platform mobile applications to keep the original appearance.
Using knowledge of ordinary languages such as (HTM5, CSS, JavaScript), developers build cross-platform applications with minimal energy loss. You create the application as a normal web / responsive application, and It will be adapted to different screen sizes. Therefore, you create one mobile app, and you will be able run it on all platforms.
You can also find many UI / UX platforms and frameworks.

What Are the Best Platforms for Creating Mobile Apps

Ionic:

This platform quickly became a secure leader in the development of hybrid mobile applications. Its creators are constantly updating and adapting new technologies. It keeps Ionic up to date. Likewise, this platform is 100% free and open source. The community downloads and shares tons of development resources, making your work with them a lot easier.
Ionic recently took advantage of the angular tools; it uses Cordova to allow users to become native for iOS, Android, Windows, etc. Overall, Ionic is our choice for rapid and resulting mobile application development.
Best Platforms for Creating Mobile Apps-ionic

Onsen UI:

Even though he is a relatively new player in the market, Onsen has managed to create a large community of fans. It is open source and available under an Apache license. By using the angular directives and the Topcoat platform for most of its user interface components, this platform creates perfect conditions for the rapid development of mobile applications. It also gives you access to jQuery-based components, so you get the perfect mix of jQuery and Angular technologies. But the main advantages are its flexibility and its great scalability.
Best Platforms for Creating Mobile Apps-onsen

Intel XDK:

Another new player on the block with great potential. Intel XDK comes with a wide range of tools that support the development, testing, emulation, debugging, and publishing of cross-platform HTM5 hybrid applications. This open source JavaScript framework powered by Intel has a clean and transparent workflow and a rich set of features, making it a leader in this domain.

Best Platforms for Creating Mobile Apps-Intel-XDK

Sencha Touch:

This platform is mainly created for mobile application development platforms in commercial areas, mainly businesses. If Ionic is a great choice for freelancers and small teams, Sencha Touch is making its way as a business platform. Its basic infrastructure, ExtJS, works perfectly to create high performance applications with a tactile experience close to native.
Best Platforms for Creating Mobile Apps-Sencha

Kendo UI:

For businesses, this platform is often preferred over others when it comes to large businesses. The Kendo user interface allows you to create literally any type of web or hybrid mobile application with HTML5, JavaScript and CSS. It is based on jQuery and contains over 70 jQuery gadgets, as well as Angular and Bootstrap user interface integration, which greatly facilitates the development process. And don't forget the ready-made themes and templates.
Best Platforms for Creating Mobile Apps-Kendo


You can also Read:
Share:

Saturday, April 18, 2020

Top Disposable Email (Update 2020)

Stop Spam
Disposable emails could be very useful for most of us, especially to avoid receiving spam or advertising mails. Here you’ll find a list of sites that allow you to create a temporary e-mail address,disposable to overcome this nuisance.
Many temporary emails exist to fight against spam. The principle is simple, it provides you with disposable email address valid for a certain time (1h, 2h or more) so you can use it on a site that requires a valid email address when registering. This will avoid polluting your main mailbox.

When you want to deal with a craigslist ad or websites you don't trust, the disposable email address is your best option. Instead of giving your personal email address, these disposable email addresses will be online for a certain period of time. There are a bunch of online services that provide the messaging services for free. These services and their characteristics are different.

In this article, we discussed how to get rid of spam and unwanted emails from your inbox using disposable email services. We have listed the best disposable email address services that are available online. You can choose the service you need based on your needs. For personal use, most of these disposable email services offer a free disposable email ID.
Note: Please do not use these services for sharing private and sensitive information.

List of Disposable, Temporary Emails:

E4ward

This temporary messaging service allows you to create multiple aliases. E4ward transfers all emails to your main email address from assigned aliases. A free user can only have one alias. You can opt for premium service to have several aliases. With this disposable email service, the user may even have more space in the cloud to store emails. In addition, you can customize your email to "alias@yourdomain.com" by adding your domain.

Mailinator

At Mailinator, you can use any alias you want to receive emails. This disposable e-mail service is in the public domain, and emails are available in public. The alias you choose can be used by anyone else. Emails you receive are deleted after a few hours. The premium plan will let you have your own personal alias that no one else can access.

TempMail

TempMail is also another public disposable e-mail service. This means that if two people choose the same alias, both receive the same emails. This disposable e-mail service does not have any privacy policy. A unique feature that TempMail gives to its user is multiple domains. You can even change the domain name of the disposable email. To change the domain name and alias, click the 'change' button. Never use this type of email when you sign up for a service. It can be hacked if someone else gets their hands on your alias and your domain.

Nada

Nada is a disposable email service for AirMail creators. This disposable email service is convenient for signing up for Internet services. Nada provides a permanent temporary inbox to its users. The inbox is valid as far as the domain remains active. You will receive a notification from them a month before the domain is refreshed. With Nada Email Service, you can create multiple aliases and domain combinations by clicking the 'Add an Inbox' button. You can delete the alias manually after use or as needed.

Guerrilla mail

All emails received in this inbox are deleted after 1 hour. Registration is not required to use this service. Guerrillamail offers users the ability to choose an alias and the desired domain. Another feature that Guerrilla Mail offers its users is to compose emails. The user can send emails to any address on the Internet. The sender's IP address is automatically integrated into the subject of the email to avoid abuse of this service. They also have an Android app that users can download from Google Play.

MohMal

MohMal in Arabic means "Junk-mail." Users of this service will benefit from multilingual support. With MohMail, the email you create will be discarded after 45 minutes to protect users. You need to refresh it periodically to avoid deletion. You can also create your alias and choose the desired domain name by clicking 'create'.

ThrowAwayMail

At ThrowAwayMail, users receive a unique disposable email identification number. ThroAwayMail has a validity of 48 hours. To make it a permanent address, you must visit the email page before completing 48 hours. Please ensure that cookies are active in your browser to ensure that this service works.

EmailOnDeck

This disposable email service provides you with a unique email address. You can use it to sign up or receive other emails. In this service, users can retrieve their email address after deletion. Use the recovery token to do this. You can't retrieve emails after you delete them. There is no specific time limit during which your email will remain in the inbox. In addition, they wipe their servers periodically. They also provide a premium service where you can have multiple disposable emails with access to certain exclusive domains and the option to register emails locally.

YOPmail

YOPmail provides 8 days of storage for emails received. Users can delete emails at any time. It also supports several languages. Their service looks premium with a very neat user interface. You cannot write emails here and send them to other service providers. Users can only send anonymous emails to YOPmail users only. In addition, they offer a plugin for your browsers for quick access to disposable email.

Disposable email services

There are times when you are not comfortable sharing your email address. You may have privacy issues or you are not sure if you trust the service provider with your email. At these times, disposable email services will be very useful to you for your security and privacy. Disposable emails guarantee anonymity most of the time.

The term disposable email refers to a specific type of email address. Users can get rid of or delete emails by planning or within a specified time frame. You can delete it manually later. Some services allow a user to create multiple email aliases. The user can choose to delete it when they receive unsolicited emails transferred to the original email address from any of these aliases.

Update: Other Disposable mails:


AnonymBox Temporary redirect or disposable email address service.

Easy Trash Forward to your real email for 15 minutes to 1 month.

GuerillaMail Disposable email.

Jetable.org Emails sent to this address are forwarded to your actual email address, email valide from one hour to one month.

Mail Temporaire The French version of Easy Trash.

Mailinator Provides email addresses publicly available and accessible without password.

MeltMail Forward to your real email for 3 to 24 hours.

MyTrashMail Temporary Email with or without password, regularly updated with new domaines.

Trashmail Forward your email for a long time.

Yopmail Same services as Mailinator.


NB: This list will be regularly updated.
Share:

Friday, April 17, 2020

How to Download Videos from Facebook (100% Working)

 How to Download Videos from Facebook

The best part about Facebook, the online social media platform, is that it managed to attract popularity among all cultures, races, and age groups. Facebook often hosts a wide variety of informative as well as entertaining videos uploaded from various corners of the world, and most of them are only available on its platform. There are some great videos that we want to downloaded and save on our devices (Computer or Smartphone)
If you want to know how to download videos from Facebook, then go through this article further to find out.
Facebook does not allow downloading videos from the website, you only the option to save the videos online on the website or app itself to watch it later. But there is no option of offline download or storing it on your device permanently.

Here is some of the best online solutions to Download Facebook videos.

How to download Facebook video for free?

A question asked by many Internet users who use Facebook. How can you download a Facebook video on your computer?
Facebook does not allow direct downloading of videos on its social network. With a simple online tool and a Chrome or Mozilla plugin, there is no need for additional softwares to save videos on your device from Facebook
Downloading your Facebook video files for free will only require retrieving the links and copying / pasting them into free online website, that's all.
Just follow the guide below.
 

Good To Know !

Before Downloading a video from Facebook, be aware that there is certainly copyright. If you are interested in a Facebook video, you can share it from the social network to one of your accounts, or just save it online to watch later.

Download Videos from Facebook

Best Online Facebook Video Downloaders:

FBDown (Facebook Video Downloader) is a download manager, an online tool allowing you to download and extract a Facebook video spotted on the social network for free, by simply entering its url. You can download all Facebook videos in MP4 format by using this tool. You can also convert this video to any format you want.
To access it: FBDown
In this website all you have to do is, copy / paste the url of the Facebook video and simply click on the Download button.

How to Download Videos from Facebook FBDown
 
The other tool for downloading Facebook videos is called FBvideosaver. It is also an online download manager for saving your Facebook videos to your Device (PC, Mac, or Smartphone) from the internet.
To access it: FBvideosaver

Download Videos from Facebook

How to retrieve the URL of the Facebook video to download

To download a free Facebook video found on a social network page, you will need to retrieve its URL.
Simply click on the video or on the date or time of publication, to display the Facebook video in full screen, and retrieve its URL. 
Now just do  CTRL+C (copy) and paste the link in FBDown. Then click Download on the right.
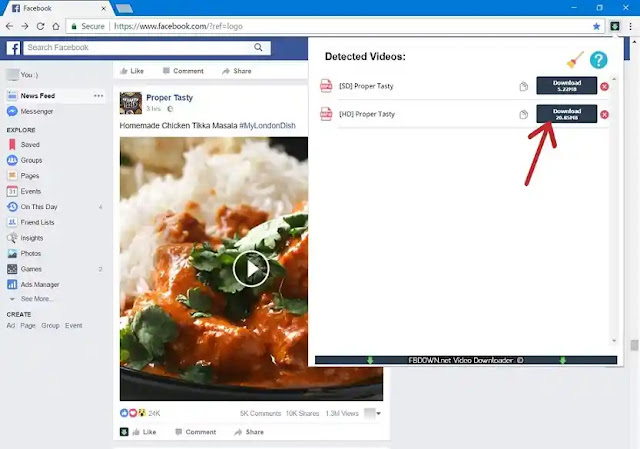
FBDown will generate a download link for the video in high quality and another one in normal quality. Choose the desired quality of the video to download.

Downloading from Facebook using a Plugin

FBDown also provides you with a Chrome plugin to allow you to download your Facebook videos directly from the social network. A Firefox plugin is under development and should be available soon.
You can download the FBDown Chrome Plugin for free, it is also available on the FBDown official website

Download Videos from Facebook-Chrome Extension

I hope this article helped you to download your videos from Facebook, if you have any question, please let me know in the comments.
Share:

Thursday, April 16, 2020

How to Get Rid of the Blue Screen of Death on Windows

Fix-Blue-Screen-of-Death-How-To

You will discover in this tutorial, the practical solutions to get rid of the blue screen of death (Blue Screen Of Death = BSOD). If you do not know it, it is a blue screen with white text which is displayed if your system has experienced errors during its work ... And this famous screen is one of the most general errors on Windows. There is not a single solution. Until today, I have not found any article on the Internet offering practical and complete solutions that work with all types of errors, I thought of writing this tutorial to show you how I personally solve this problem! You will see how to fix this screen of death in both cases, if it appears before or during your use of Windows With this tutorial you will be able to Repair your computer and get rid of that annoying blue screen! 

NB: This tutorial works with all versions of Windows up to Windows 10. Let's go!

The main causes of the blue screen of death?

There are several types of errors, each one has its causes, for most cases, it is a Driver which is not compatible with your system. or to your device, it may also be the case of an error produced in your Windows registry as it may be due to a new device (RAM memory card, graphics card, etc.).

If you know the last thing you did while using your computer, great! You are more likely to repair your computer easily. Here are the best known and most common causes:
  • Driver Installation: The Driver you just installed may not be compatible with your operating system , so you have to uninstall it, or just update it.
  • Installation of new hardware: It is also likely that the problem comes from a device that you just installed, not known by your operating system, or is not compatible, so you will need at least the driver.
  • RAM crash: It may be that the blue screen comes from your memory module, you used it improperly for a long period of time without restarting it... Or you have forced your computer to run programs requiring more RAM.
  • Heat: Your computer does not support the amount of data and the tasks you requested, try to clean the fans to cool it ...
  • Over charge: If you try to run programs and applications that require high performance, your computer will heat up, it will crash and translate all this into a beautiful blue screen, think about optimizing your hardware.
There are several causes that can introduce the screen of death, but for the most part it is problems that have to do with the hardware of your computer. Either you have installed a driver, and it is not compatible with your computer, or you have added a new device in your machine (examples: memory board, graphics card, hard drive, etc.).
The problem may also come from Windows, specifically from your registry!

What does a blue screen of death look like?

Here is what a blue screen of death looks like:

Fix-Blue-Screen-of-Death-Win32.sys-

As I mentioned in the image above, the blue screen consists of a blue page, written in white. The header of this famous page does not change, but the name of the error does. Let’s start our tutorial, by a quick solution (for beginners) and solutions that require attention.

How to block the automatic restart:

You can block the automatic start of Windows during the rapid display of the blue screen of death via the registry ...

NB: Make a backup to your registry, before trying this Solution...

Open the Notepad, paste this code:


Windows Registry Editor Version 5.00 [HKEY_LOCAL_MACHINESYSTEMCurrentControlSetControlCrashControl] "AutoReboot"=dword:00000000


Save it under your file under the name: Openhow-autorestart.reg (.reg and not .reg.txt)
Double-click on the created file to disable automatic restart.

You can use this second code if you want to re-enable automatic restart:


Windows Registry Editor Version 5.00 [HKEY_LOCAL_MACHINESYSTEMCurrentControlSetControlCrashControl] "AutoReboot"=dword:00000001


If this did not work, or you cannot insert values ​​via a file, you can do everything just follow the path and change or create the DWORD value to 0 or 1.

Try Safe Mode, Restore!

Have you tried entering Safe Mode to your Windows, because for most cases, the blue screen is not displayed if you use Safe Mode (as the name suggests).
You can access Safe Mode by repeatedly pressing the "F8" key during the first seconds of startup, before Windows loads.
If the Windows starts without displaying a list, restart and try again.

A page with a white menu, black background will appear, you have 2 possibilities ...

  • Either you use the normal safe mode, without Internet connection choose the option: Safe Mode.
  • If you want to use the Internet connection, just choose the option: Safe Mode with network support.

Use the keys, up and down to select the option to enter safe mode, type ENTER.

A list of data will scroll for a few seconds, Windows will start without the death screen Once Windows is launched, the safe mode will ask you if you do not want to restore ... Choose No to restore on a date well defined in order to recover your data and get rid of the blue screen for good. Choose Yes, if you don't have System Restore enabled.

Don't worry, if you entered Safe Mode without seeing the death screen, everything will be resolved!
If you see the blue screen even using the safe mode, you must use the Mini Windows XP provided by the Hiren's BootCD.

Get rid of the blue screen with the Anti-Crash tool

If the blue screen apears only after some time of using your Windows, then you are more lucky and you have few minutes to repair the boot of your Windows!
I will start this tutorial with a very effective utility, it allows you to scan and find the errors in the Windows startup files, and after that, remove the blue screen of death.
Remember that you can with this utility repair most of the errors in your RAM modules and Windows files and registry… It does all the work, with one click!

Download and installation:

You can download Anti-Crash, using this direct link:  Anti-Crash
The installation takes only a few seconds… After installation, click on “Finish” and launch the software.

How to use Anti-Crash to get rid of the screen of death:

After launching the software, it will ask you to register the license, click on "Continue Trial" because you will use this tool only 2 times at most to repair your computer and get rid of the blue screen.

Fix-Blue-Screen-of-Death-anticrash-1

Click on the "bone" icon to launch the utility to open the main window of the edition including the Anti-Crash including. Click on "Main menu" of Anti-Crash.

Fix-Blue-Screen-of-Death-anticrash-2


Make an automatic repair by clicking on "Run Auto-repair".

Fix-Blue-Screen-of-Death-anticrash-3


The utility will examine all hardware that can be infected by errors, including RAM ... it will scan the registry and system files. Just click Next and follow the instructions.

Fix-Blue-Screen-of-Death-anticrash-4


The scan will start, the repair right after ... It may take more than an hour, depending on your configuration and the power of your computer. After the scan and repair, click on "Finish" and restart In my case, "No errors found" means that the software has not found any problem.

Diagnose the problem, and find out the files causing this problem:

You can, using a tool provided by Microsoft called "Blue Screen View", read DUMP files automatically created by Windows in order to decode the code without going through Google.

The utility does not require any installation, so you can use it quickly in safe mode if the blue screen s displays before Windows starts.

Download Blue Screen View:

You can download the Blue Screen View using this LINK.
Unzip the downloaded archive é using the Winrar software, and execute it by double-clicking on the executable file "BlueScreenView.exe".
The utility will automatically detect the DUMP files located in the hard drive of Windows (Usually C drive). You can change the location via the utility menu.

Fix-Blue-Screen-of-Death-view


As you can see, the software gives you the dates and time for each crash caused by the blue screen of death, and other details ... At the bottom you can find the files related to the selected error.

For 90% of the cases, the drivers are displayed, so the problem comes from these drivers. You must either delete them, replace them or update them. If you can,t access Safe Mode you can always use Hiren's BootCD,

If you have any question about Blue Screen of Death, Please let me know in the comments.
Share:

Wednesday, April 15, 2020

How to Disable Automatic Updates on Windows 10

How to Disable Automatic Updates on Windows 10 -Trun-off

If you have the Windows 10 on your computer and you want to stop automatic updates for any reason, may be to keep your full internet speed or any other reason, here I will show you how to do it.

Why do some people choose to turn off Windows updates?

Certainly updates are useful for they allow us to stay safe and keep the system protected against recent security threats.The downside of having updates running automatically is that they may slow down your internet speed especially when playing online games that require low ping.

If you are using Windows 10 pro you can disable updates with few clicks but when using the home version of Windows 10 you will find it difficult to stop updates.
In this tutorial we will discover how to stop updates. One of the benefits and positives of learning how to stop automatic updates is having more control over your computer and being able to install updates only when it’s convenient for you.

Pause Windows Updates on Windows 10

Open Settings using Windows+I keys’ combination.Then click on “Update & Security“.

Windows Update settings
You can pause updates for 7 days…Or go to Advanced options. And choose the end date of updates pausing.

Pause windows updates

Turn Off Windows Update from Services

You can disable Windows Updates by a simple trick. As you may know Windows 10 is a service and updates are automatic by default, this means your PC will get the latest features and fixes. If you don’t want your Windows to be updated automatically then just follow this tutorial.

Open Run using the Windows+R combination keys. Type in the command services.msc and click OK. You can also search for Services in the Start menu if you are using Windows 10.
Find the service “Windows Update” in the list and double-click on it (or right-click and choose Properties), and select “Disabled”. Click “Stop” to end the service from running in the current session. Click on “Apply” and “OK“.

How to Disable Automatic Updates on Windows 10

After this Windows 10 won’t update itself automatically which means that your PC will never get or download any new updates from Microsoft.
If you want to go back and re-enable automatic updates you can change the value of Windows Updates service startup type to Automatic or Manual.

Disable Updates Using Group Policy Editor

In case you are connected to a network whose updates are managed by a group policy then you will need to use the Group Policy Editor on the Admin account since you can’t make changes on Windows Updates.
Open Run and launch the command gpedit.msc. Or search for Edit group policy in Start menu or Cortana.
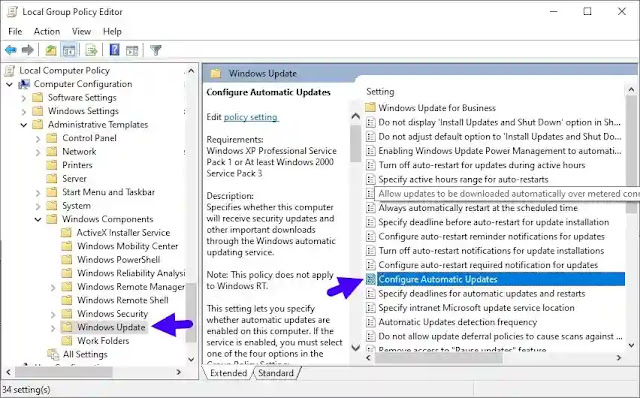
The window Local Group Policy Editor will open up, go to: “Computer Configuration” > “Administrative Templates” > “Windows Components” > “Windows Update
Double-click on “Configure Automatic Updates” on the right side of the window.

How to Disable Automatic Updates on Windows 10

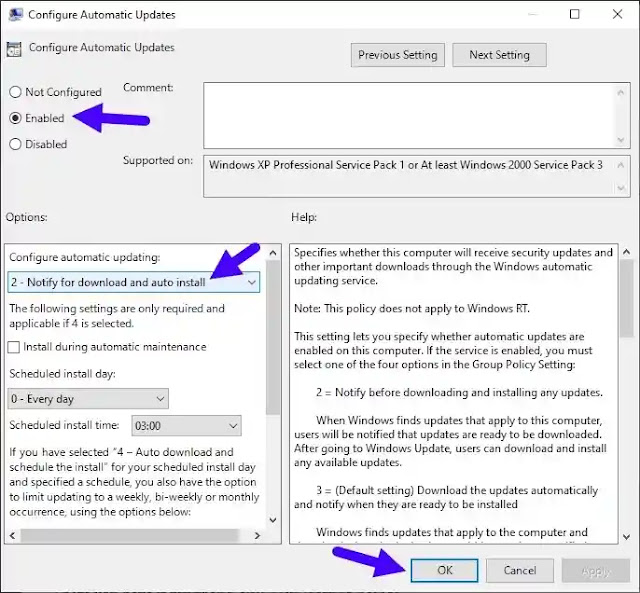
Check “Enabled” and choose “Notify for download and notify for install” to prevent the automatic download of updates on Windows. Click “OK” to save settings.

How to Disable Automatic Updates on Windows 10

Now it's done, you have learned how to disable automatic updates on Windows the easy way.

Share:

Labels

100000 Stars (1) 2013 (1) 360° panorama (1) 80's games (1) Air traffic (1) Airplane (1) Airplane tracker (1) Airplane traffic (1) Amazon (1) Amazon delivery (1) analyze files online (1) Analyze online (1) Analyze URL (1) Android (14) Android applications (6) Android applications on PC (1) Android codes (1) Android emulator (1) Android secret (1) Animation (1) Antivirus (1) app (11) App store (2) Apple (1) April fool's (2) ASCII Art (1) Atomes (1) audio converter (2) Augmented Reality (1) Avatar (2) Avoid spam (1) Bandwidth (1) Bank (1) Battery (1) beautiful folder (1) Best IPTV (1) Best of (1) BlackBerry (1) Block (7) Blog (1) BlookUp (1) Blue Screen (1) BlueStacks (1) BlueStacks emulator (1) Book (2) Breaking Captcha (1) bug (2) Bypass (2) Bypass Captcha (1) Bypass Captcha verification (1) Bypass SMS verification (3) Call verification (1) Camera (1) Camera Size (1) Camera Trace (1) Canon (1) Captcha code (1) Cartoon (1) Cartoonify (1) Cast (1) Change color folder (1) Change font (1) Change IP (4) change website font (1) Charge (1) Check email offline (1) Christopher Sholes (1) Chrome (2) Chrome Experiments (2) Chrome extension (4) Chromebook (1) Chromebook Pixel (1) Cloud Computing (2) Community (1) Compare tool (2) Computer (50) Computer theft (1) Convert (2) Convert files online (1) Convert image to ascii (1) Convert online (2) Corona (2) Coronavirus (2) COVID-19 (2) Create game (1) Credit Card (3) Credit Card Generator (1) Crypt (1) Delete (2) desktop shortcut (1) Detonate nuclear bomb (1) Digital Camera (2) Diposable (1) Direct download (1) Direct download torrent (1) directory (1) dirlock (1) Disconnect Facebook Messenger on Android (1) Disconnect from Facebook (1) Documents (1) Download (3) Draw on desktop (1) Draw on screen (1) Draw on windows (1) Draw on your windows desktop (1) Drones (1) Duplicate folders in same place (1) EA Sports (1) Ebook (2) Electronic video games (1) email (4) Email management (1) Emulator (1) Excel (1) Extension (2) Eye test (1) Eyesight (1) Facebook (13) Facebook chat (1) Facebook infographic (1) Facebook Messenger (1) Facebook Photo Zoom (1) FIFA (2) File (3) file converter (1) File without name (1) Find (1) Find Camera (1) Find computer (1) Firefox (1) Firefox extension (1) fix (3) Flash drive (1) FlightRadar24 (1) Folder with no name (1) Folder without name (1) Folders (2) Folders different color (1) Folders with same name (1) font (1) Fonts (1) Format (1) Free Call (3) Free International Calls (1) FREE SMS (1) FREE SMS Online (1) FREE SMS worldwide (1) Free VCC (2) Galaxy (1) Galaxy Grand 2 (1) Gameglobe (1) Gameplay (1) Games (6) Games online (1) Gmail (1) Golden Touch (1) Google (7) Google Glass (1) Google Helpouts (1) Google Hyperlapse (1) Google Nose (1) Google photos (1) Google Play (3) Google Plus (1) Google Street View (1) GPS (1) GTA (1) Hack (6) Handimation (1) Help over live video (1) Helpouts (1) Hide (3) Hotspot (1) How to (100) How to. (2) Hyperlapse (1) iCloud (1) Image (1) image converter (1) image to ascii (1) Infograghic (1) Inside submarine (1) Instagram (2) Intel (1) International air traffic in real time (1) Internet (95) Internet Connection (1) iOS (8) iOS applications (2) iphone (6) IPTV (1) Journey through Middle-earth (1) Keyboard (3) keyboard layout (1) Landscapes (1) Laptop (1) Life-size (1) Listen music (1) Listen to websites (1) Live (2) Live flight tracker (1) Lock (4) Lock file (2) Lock folder (1) Lock USB (1) Lock your file with a Password (1) Lord of the Rings (1) Lost Camera (1) Mac (5) MAC Address (1) MAC-OS emulator (1) Magnifying the Universe (1) Make game (1) map (3) Mars (1) Martian panorama (1) Martian sol (1) Media (1) message (2) Messi (1) Middle Earth (1) Milky Way (1) Most viewed (1) Most viewed videos (1) Most viewed Youtube (1) Mouse over (1) Movies (2) MS-DOS emulator (1) Museum of me (1) Music (1) nameless folder (1) Namie Amuro (1) NASA (2) Netflix (3) Network (3) Nokia (1) Nokia Lumia 525 (1) Nose (1) Nuclear (1) Nuclear weapons effects simulator (1) Nuke (1) Nuke simulator (1) Ocelot (1) Office Lens (1) Offline (1) Old OS (1) Online music (1) Operating System (1) optical illusion (1) P’9982 (1) Paint (2) Panorama (1) Password (7) Paypal (3) Paypal auto Payment (1) Paypal Payment Subscription (1) PC (1) PC to Mobile (1) Personal assistance (1) Phablet (1) Photo Zoom (1) photos (6) Photoshop (1) PIN (1) Porsche (1) Prime Air (1) Privacy (3) Private network (2) Proxy (2) QWERTY (1) Radar (1) Real-size (1) Real-time (3) Real-time air traffic (1) Rebtel (1) Receive SMS online (1) Recover (1) Remington (1) Rocknest (1) Rooter (1) Run Android apps on PC (1) Run Android apps on Windows (1) Safari (1) Safari extension (1) Samsung (2) Satellite (2) Scan (2) Scan files online (1) Scan online (1) Scan URL (1) Scan Virus (1) scheduled shutdown (1) Screen of Death (1) Scribd (1) Secret codes (1) Secret Menus (1) Secure file (1) Secure folder (1) Security (22) Seen block (2) Seen Facebook (1) Self-destruct (1) SelfishNet (1) Send FREE SMS (1) Sexy (1) Share (2) shortcut (2) Sight test (1) Simulator (3) Skype (2) Smartphone (11) SMS (2) SMS verification (2) Snap (2) Snapchat (1) Social network (8) Software (2) Soundgecko (1) Space (2) Spam (3) speed connection without software (1) Speed up connection (2) Speed up Windows connection (1) SpotAuditor (1) Spying (1) Starlink (1) Status Search (1) Steganos (1) Stolen Camera (1) Stop Motion (1) Stop spam (2) Stream (4) Street View (1) Submarine interior (1) Submarine with Google Street View (1) Surf anonymous (2) Talk Free (1) Tech (27) Temporary email (1) text to ascii (1) text to audio (1) text to mp3 (1) text to sound (1) text to speech (1) Time-lapse (2) Timelapse (2) toolkit (1) Tools (2) torrent (2) Torrent from URL (1) Torrent to direct (1) Track (4) Track computer (1) Track missing computer (1) Translate (1) Turn your blog into a book (1) Tutorials (9) two folders same name (1) Type Faster (1) Typewonder (1) Typing (1) UAV (1) Unblock (4) Unfriend Finder (1) Unfriend me (1) Universe (1) Unlock (2) unsubscribe (1) update Facebook Status (1) Update Facebook status using iphone (1) Updates (1) URL to Torrent (1) USB (2) useless (1) useless web (1) Verified (1) Verify Paypal (1) Viber (1) Video (6) video converter (2) Virtual (3) Virtual computer (2) Virtual Credit Card (2) Virtual desktop (2) Virtual museum (1) Virtual radar (1) Virtual Reality (1) Virus (4) Vision test (1) VLC (1) VPN (5) WAYme (1) We're watching you (1) Weapon (1) website (1) website fonts (1) website shortcut (1) WhatsApp (2) Wifi (1) Wikipedia (1) Windows (15) Windows folder (1) word to ascii (1) word to pdf online (1) Xlsx (1) Youtube (4) Youtube close (1) Zoom (1)

Blog Archive